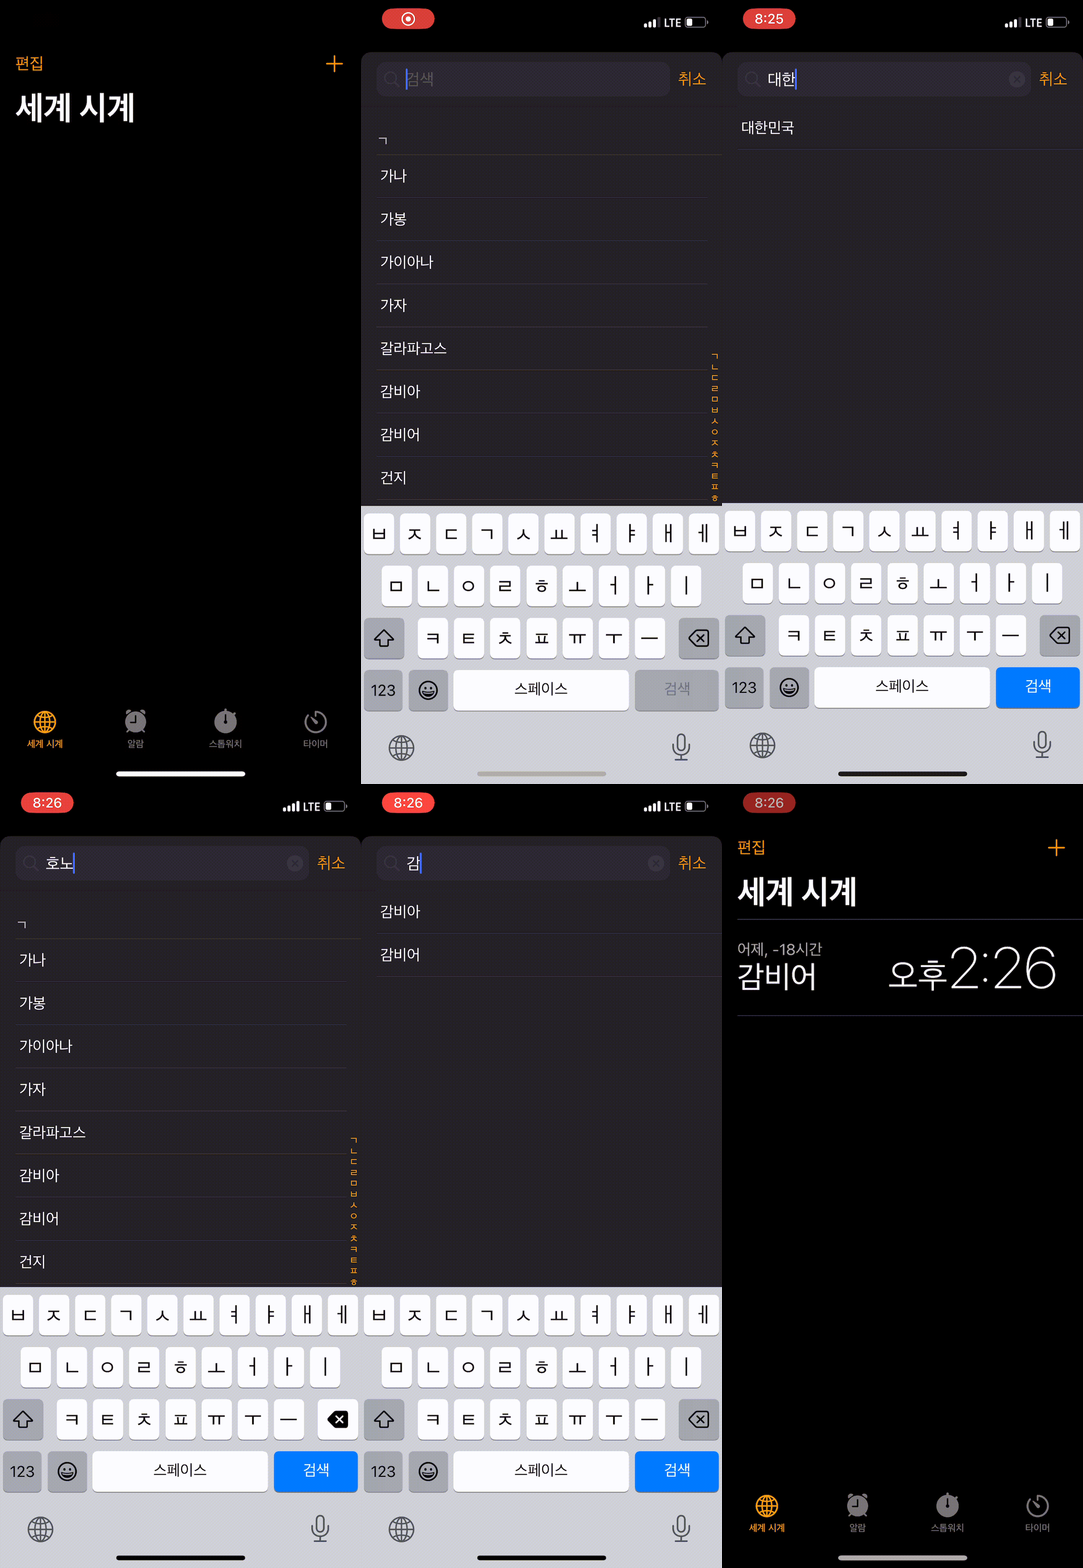
이번 문서를 확인하기 전 테이블뷰 인덱싱 (opens new window) 문서를 읽고 오시면 흐름에 대해 쉽게 이해하실 수 있습니다.
# UISearchBar
스위프트에서는 서치바 기능을 제공한다. 델리게이트 메서드를 통해 원하는 검색 조건을 생성할 수 있고 이에 따라 검색결과 데이터를 원하는 대로 표현할 수 있다.
아래는 직접 UISearchBar를 가지고 직접 구현한 화면이다.

# UI 적용
서치바는 xcode 컴포넌트 라이브러리에서 사용해도 되지만 이번 문서에서는 코드로 작성할 것이다.
위의 화면에서 구현된 결과물의 구조는 뷰컨트롤러 - 네비게이션 컨트롤러 - 뷰 컨트롤러 형태로 이루어진다. 이때 모달 형태로 표현되는 최종 뷰 컨트롤러의 타이틀에 서치바를 삽입하려고 한다.
서치바 세팅 및 각종 속성을 설정하는 코드는 아래와 같다.
 func setupSearchBar(){
        searchBar.searchBarStyle = UISearchBar.Style.default
        searchBar.placeholder = "검색"
        searchBar.delegate = self

        // UISearchBar 텍스트필드 색상 변경
        if let textField = searchBar.value(forKey: "searchField") as? UITextField {
            textField.textColor = .white
        }

        // 플레이스홀더 컬러세팅
        let textFieldInsideSearchBar = searchBar.value(forKey: "searchField") as? UITextField
        textFieldInsideSearchBar?.attributedPlaceholder = NSAttributedString(string: "검색", attributes: [NSAttributedString.Key.foregroundColor: UIColor.darkGray])

        // 네비게이션 바에 삽입
        navigationItem.titleView = searchBar
    }
설정에 사용된 내용은 크게 세가지로 나누어진다.
- 서치바에 포함된 텍스트필드를 꺼내온 뒤 입력되는 텍스트들에 대한 색상값을 세팅해준다.
- 서치바에 포함된 텍스트필드를 꺼내온 뒤 플레이스 홀더 색상값을 세팅해준다.
- 네비게이션 아이템의 타이틀 뷰에 서치바를 끼워넣는다.
텍스트필드 플레이스홀더 컬러 변경
위에 소개된 서치필드 플레이스홀더의 색상을 변경해줄때 attributedPlaceholder라는 속성에 접근하는 것을 볼 수 있는데, 이는 서치필드뿐만 아니라 일반적으로 사용되는 UITextField에서도 사용 가능하다.
myTextField.backgroundColor = .blue
myTextField.attributedPlaceholder = NSAttributedString(
    string: "Placeholder Text",
    attributes: [NSAttributedString.Key.foregroundColor: UIColor.white]
)
NSAttributedString 인스턴스를 할당해주면 되고 플레이스홀더 텍스트와 해당 텍스트에 대한 각종 속성들을 넣어줄 수 있다.
attributes파라미터는 [NSAttributedString.Key.속성: 속성타입] 딕셔너리 타입이다. 위의 경우 키값의 속성이 UIColor타입이므로 키에 대한 밸류 또한 컬러값으로 지정하는 것을 볼 수 있다.
서치바를 삽입한 뷰 컨트롤러가 네비게이션 바를 기반으로 한다면 navigationItem이라는 속성에 접근할 수 있다. 이 내부에는 titleView라는 속성을 기본적으로 nil 형태로 갖고 있으며 해당 뷰 자체를 만들어놓은 서치바 인스턴스로 교체해주면 된다.
# 서치바 기능 구현
서치바에 대한 UI구성은 완료하였으니 실제 구현을 해야한다. 반드시 잊지 말아야 할 것은 서치바 기능을 위해 서치바 인스턴스에 대한 delegate를 지정해줘야 한다는 것이다. 현재 뷰 컨트롤러가 서치바를 관리한다면 searchBar.delegate = self 코드를 꼭 삽입해주자.
델리게이트 지정 후에는 메서드를 구현해주자. 구현 대상은 func searchBar(_ searchBar: UISearchBar, textDidChange searchText: String)이다.
class WorldClockSelectViewController {
    var filteredData: [String] = []

    // ... 나머지 코드
}
extension WorldClockSelectViewController: UISearchBarDelegate{
    func searchBar(_ searchBar: UISearchBar, textDidChange searchText: String) {
        filteredData = searchText.isEmpty ? myData : myData.filter({ str -> Bool in
            return str.range(of: searchText, options:[.caseInsensitive]) != nil
        })
        tableView.reloadData()
    }
}
위 코드의 로직은 전체 데이터를 담고 있는 배열에 대해 필터링을 하는데, 필터링 조건은 myData 각 문자열이 부분 문자열로 textDidChange 아규먼트의 스트링 값을 가질때 true를 리턴하여 해당 요소들을 filteredData라는 새로운 배열에 담는 것이다.
필터링된 배열들을 테이블 뷰에 새롭게 뿌려주기 위해서 테이블 뷰를 리로딩 해주고, 테이블뷰 델리게이트 메서드에 로직 몇가지를 추가해준다.
// 섹션 타이틀 없애기
func sectionIndexTitles(for tableView: UITableView) -> [String]? {
    // filteredData 로직
    if(filteredData.count != 0){
        return nil
    }
    return sectionTitles
}

// 섹션 인덱스 없애기
func tableView(_ tableView: UITableView, sectionForSectionIndexTitle title: String, at index: Int) -> Int {
    // filteredData 로직
    if(filteredData.count != 0){
        return 0
    }
    return index
}

// 섹션 전체 숫자를 1개로 합쳐버리기
func numberOfSections(in tableView: UITableView) -> Int {
    // filteredData 로직
    if(filteredData.count != 0){
        return 1
    }
    return sectionTitles.count
}

// 섹션 타이틀 스트링 없애기
func tableView(_ tableView: UITableView, titleForHeaderInSection section: Int) -> String? {
    // filteredData 로직
    if(filteredData.count != 0){
        return nil
    }
    return sectionTitles[section]
}

// 섹션별 row 개수 정의
func tableView(_ tableView: UITableView, numberOfRowsInSection section: Int) -> Int {
    guard let clockDataWithSectionArray = clockDataWithSection[sectionTitles[section]] else {
        return 0
    }

    // filteredData 로직
    if(filteredData.count > 0){
        return filteredData.count
    }else{
        return clockDataWithSectionArray.count
    }
}

 func tableView(_ tableView: UITableView, cellForRowAt indexPath: IndexPath) -> UITableViewCell {
        let cell = tableView.dequeueReusableCell(withIdentifier: "WorldClockSelectCell", for: indexPath) as! WorldClockSelectTableViewCell

        guard let clockDataWithSectionArray = clockDataWithSection[sectionTitles[indexPath.section]] else {
            return UITableViewCell()
        }

        // filteredData 로직
        if(filteredData.count == 0){
            cell.data = clockDataWithSectionArray[indexPath.row]
        }else{
            cell.data = filteredData[indexPath.row].0
        }

        return cell

    }
UITableViewDataSource 델리게이트에서 서치바로부터 filteredData 요소가 추가되었다면~에 대한 로직을 추가한 것 뿐이다. 이를 코드 형태로 표현한 것이 filteredData 배열의 count 속성이다.
필터링 된 데이터도 가나다순의 섹션을 갖도록 하고싶으면 filteredData를 딕셔너리 형태로 구현하면 될 것이다. 자세한 내용은 다음 문서 (opens new window)를 참조하자.